Day 24 : Monica, Oh my darling !
Date : Thursday, October 24th, 2013
Day : 24

OK people, let's do this! With this class logged in, I have only one more class to complete that board.

Wow. I cant seem to take straight pictures EVER!
A very sleepy day. Fortunately a Thursday, which means I have another night of getting up and going to work and then weeeekeeeend! My post is called "Monica, oh my darling" because today's class was Hot hom by Monica and there's this really popular hindi song called that ! Like, it's a cult song. If you are watch bollywood movies and don't know that song, well, umm, you should be a little ashamed at yourself :|
So I also asked Monica what is the cause for this pain on the right thigh and back leg and what I should and shouldn't do. She said I should be careful when stretching, and that I should always always always suck my stomach in, and push it towards the spine, because that makes sure that I don't compress my spine and i'm stretching my whole back.And also mentioned that I should do the adho mukho kapotasana or the sleeping pigeon pose, that will be really really beneficial and is an awesome asana. And so I went to class and did the pigeon pose for 15 mins alternating the legs, before Monica came in.
I've decided to see a doctor if the pain doesn't disappear int he next 2-3 days.
Today's class was the usual Hom loveliness and Monica, being Monica, made us do a couple of extra core poses also. Haha. But I appreciate her checking in on me, in some poses that required me to stretch. I love Hom teachers, they are just so lovely.
So as promised in the last post, I will talk about Halasana or the Plow Pose and the Matyasana or Fish pose today. Even though we didn't do these in the class today, these are two asanas that follow my lovely salambha sarvangasana and hence they deserve some love on this blog :)
Halasana or Plow Pose

(Image courtesy : chakras.org.uk)
So after you come down from your shoulder stand and directly go into halasana. Here's the brief how to:


I once asked Anton, why is the fish pose called fish pose, like it doesn't obviously resemble a fish, and he told me that if you do that pose in water, you can float for long! Traditionally, out of the three poses in the above series of pictures, the full expression of Matsyasana is the last one, with the feet in padmasana. But that can be a little tough for beginners to do. The asana is essentially a backbend where you lie on your back and lift you heart towards the sky, by rising up on the elbows and drawing the shoulders back. As the neck lengthens, the crown of the head is pointed towards the 'wall' (the floor) behind you. As the arch of the back deepens with the practice, the heart and the throat open more. the top of the head may brush the ground but no weight should rest on it.
I love this pose and it brings immense relief to your back and spine, especially after the shoulder stand. Here's step by step how to :
Namaste.
Day : 24
OK people, let's do this! With this class logged in, I have only one more class to complete that board.
Wow. I cant seem to take straight pictures EVER!
A very sleepy day. Fortunately a Thursday, which means I have another night of getting up and going to work and then weeeekeeeend! My post is called "Monica, oh my darling" because today's class was Hot hom by Monica and there's this really popular hindi song called that ! Like, it's a cult song. If you are watch bollywood movies and don't know that song, well, umm, you should be a little ashamed at yourself :|
So I also asked Monica what is the cause for this pain on the right thigh and back leg and what I should and shouldn't do. She said I should be careful when stretching, and that I should always always always suck my stomach in, and push it towards the spine, because that makes sure that I don't compress my spine and i'm stretching my whole back.And also mentioned that I should do the adho mukho kapotasana or the sleeping pigeon pose, that will be really really beneficial and is an awesome asana. And so I went to class and did the pigeon pose for 15 mins alternating the legs, before Monica came in.
I've decided to see a doctor if the pain doesn't disappear int he next 2-3 days.
Today's class was the usual Hom loveliness and Monica, being Monica, made us do a couple of extra core poses also. Haha. But I appreciate her checking in on me, in some poses that required me to stretch. I love Hom teachers, they are just so lovely.
So as promised in the last post, I will talk about Halasana or the Plow Pose and the Matyasana or Fish pose today. Even though we didn't do these in the class today, these are two asanas that follow my lovely salambha sarvangasana and hence they deserve some love on this blog :)
Halasana or Plow Pose
(Image courtesy : chakras.org.uk)
So after you come down from your shoulder stand and directly go into halasana. Here's the brief how to:
- From salambha sarvangasana, exhale and lower your hip joint, bringing your toes towards the floor over and above your head. As much as possible keep your body perpendicular to the floor and your legs fully extended and not bent.
- With your toes on the floor, lift your thighs and tailbone towards the ceiling. Like your torso is hanging from the height of your groins. Continue to draw your chin away from the sternum and soften your throst
- You can continue to keep pressing you hands against the torso pushing the back up as the back of your forearms rest on the floor. Or you can release the hands away from your back and place them on the floor, stretching them in the opposite direction of the legs. Clash the hands the press the arms actively down as you lift your thighs towards the ceiling
- You can be in the asana for for 1-5 mins and to release : bring your hands back onto you back again and lift up into sarvangasana with an exhalation and roll down onto your back. Or you can just roll out of the pose with an exhalation without the sarvangasana.
So, that's halasana. After that we usually do the matsyasana or the fish pose as a counter pose to salambha sarvangasana and halasana.
Variation 1
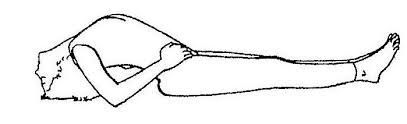
I once asked Anton, why is the fish pose called fish pose, like it doesn't obviously resemble a fish, and he told me that if you do that pose in water, you can float for long! Traditionally, out of the three poses in the above series of pictures, the full expression of Matsyasana is the last one, with the feet in padmasana. But that can be a little tough for beginners to do. The asana is essentially a backbend where you lie on your back and lift you heart towards the sky, by rising up on the elbows and drawing the shoulders back. As the neck lengthens, the crown of the head is pointed towards the 'wall' (the floor) behind you. As the arch of the back deepens with the practice, the heart and the throat open more. the top of the head may brush the ground but no weight should rest on it.
I love this pose and it brings immense relief to your back and spine, especially after the shoulder stand. Here's step by step how to :
- Lie on your back on the floor with your knees bent, feet on the floor. Inhale, lift your pelvis slightly off the floor, and slide your hands, palms down, below you bum. Then rest you bum on the backs of you hands. Tuck you forearms and elbows up close to the sides of your torso.
- Inhale and press your forearms and elbows firmly against the floor. Press you shoulder bones into your back and with an inhale lift your upper torso and head away from the floor. Then release your head back onto the floor. There should be minimal amount of weight on our head to avoid crunching your neck ( trust me that hurts!)
- You can keep your knees bent or straighten your legs out onto the floor. If you straighten, then keep your thighs active and press out through the heels.
- Stay for 15-30 seconds breathing smoothly. With an exhalation lower you torso and head to the floor. Draw you thighs up into your belly and squeeze.
Namaste.


Comments
Post a Comment